Decoupling - Dependency Injection in C# ASP.Net MVC for Microsoft Azure Table Storage using Autofac
So, you’re all coupled up…
…time to change that! Enter, “dependency injection” - a SOLID principle for executing the art of “decoupling”, as an implementation of the inversion of control (IoC) design pattern.
Specifically we’re going to look at using Autofac in C# to inject Azure Table Storage into Asp.Net MVC…yes, you’re about to see how much easier it is to manage your dependency coupling using the correct frameworks, in just a few lines of code.
What’s Inversion of Control?
Inversion of control is a design pattern for decoupling systems. It’s an abstract principle, defining that the execution flow is controlled by an external provider. Dependency injection is an implementation of this pattern, although the terms are often used interchangeably.
By virtue of the fact that a component is written using an interface, it gives up its control of how the underlying code is implemented. The control of the implementation itself is therefore inverted (moved) from the component to an external host of said component…hence “inversion of control”.
Let’s get some definitions out of the way…
“Dependency Inversion” is the “D” within the SOLID principle definition. This is to say that “it is key to depend upon abstractions, not concrete implementations.”
A dependency is an “object” that can be used, whilst an injection is the “passing” of that dependency, to a dependent object…in a scenario where that dependent object would use the dependency.
…I know, sounds complicated right…?
Interesting…But how does one inject ones abstract dependencies?
The key approach to getting the result you want is to use an inversion of control (IoC) container such as Autofac.
Assuming you’re unfamiliar with this idea, and to some degree this particular SOLID principle - Autofac allows you to easily manage dependencies between classes in .Net, by treating these classes as components.
Given this, it ensures you can centralise the logic for dependency management, meaning amends to your application level code become easier to handle as they increase in complexity over time.
Why Autofac?
The beautiful thing about Autofac is that unlike similar technologies, it sticks to being as close to raw C# code as possible, thus retaining the object oriented design (OOD) approach. You’ll note that various libraries which are available for the .Net stack can have a tendency to lean towards functional programming design, and there’s nothing wrong with that, but let stick to our guns and focus on OOD for the time being…
Before We Get Started…
You need the following installed locally -
- Microsoft Windows.
- Microsoft Visual Studio 2017.
- .Net Framework 4.7
- Microsoft Azure Storage Exporer.
Some Assumptions…
I’m going to assume that you already know how to build a CRUD layer on top of Azure Table Storage, and are therefore familiar with NoSQL database concepts, specifically when it comes to the use of partition keys and row keys as and when necessary…
…I’m also assuming you know your way around C# Asp.Net MVC…
Ok ok ok…Gimme gimme!!
First, you’ll need to create a fresh Asp.Net MVC project using Microsoft Visual Studio, and then we can get started…
Lets create a new class library for our contracts, pull in the “WindowsAzure.Storage” package from Nuget, and define a simple class to represent our underlying data model. You’ll note that we inherit from the Microsoft Azure Storage “TableEntity” class, which is of course necessary in order to store our data model in our NoSQL table as each row requires a PartitionKey and RowKey before it can be saved.
using Microsoft.WindowsAzure.Storage.Table;

namespace SimonGilbert.Blog.Contracts
{
    public class UserAccount : TableEntity
    {
        public string FirstName { get; set; }

        public string Surname { get; set; }

        public string City { get; set; }

        public int AgeYears { get; set; }
    }
}
Database Repository
The next step is our database repository, so in the interest of retaining our existing separation of concerns design, lets create a new class library for our repository, pull in the “WindowsAzure.Storage” package from Nuget again for this library also, and start implementing our repository code.
You’ll need an instance based class which inherits from an underlying interface, because after all, the design pattern itself is based on us depending on abstractions, not concretions! Once your interface class is in place, pull in an instance of the Windows Azure Storage “CloudTable” class, and pass it into the constructor (you’ll see why in a minute). Following this we can define a simple “Create” method as the initial part of our CRUD database layer.
using SimonGilbert.Blog.Contracts;
using SimonGilbert.Blog.Repositories.Interfaces;
using Microsoft.WindowsAzure.Storage.Table;

namespace SimonGilbert.Blog.Repositories
{
    public class UserAccountRepository : IUserAccountRepository
    {
        private readonly CloudTable _table;

        public UserAccountRepository(CloudTable table)
        {
            this._table = table;
        }

        public TableResult Create(UserAccount model)
        {
            var result = _table.Execute(TableOperation.Insert(model));

            return result;
        }
    }
}
Service Layer
Now that we have our data model contract and our database repository, we need to implement our service layer in a dedicated class library for our services. The service class is also an interface driven instance based class, which pulls in a reference to our repository class, injected into the constructor.
You’ll note that we also need to pull in the “WindowsAzure.Storage” package from Nuget again for this library too, as we’ll be passing in our data model contract to the service “Create” method, before submitting it to our underlying database repository class.
using SimonGilbert.Blog.Contracts;
using SimonGilbert.Blog.Repositories.Interfaces;
using SimonGilbert.Blog.Services.Interfaces;
using Microsoft.WindowsAzure.Storage.Table;
using System;

namespace SimonGilbert.Blog.Services
{
    public class UserAccountService : IUserAccountService
    {
        private readonly IUserAccountRepository _repository;

        public UserAccountService(IUserAccountRepository repository)
        {
            this._repository = repository;
        }

        public TableResult Create(UserAccount model)
        {
            //Set Azure Keys...
            model.PartitionKey = Guid.NewGuid().ToString();
            model.RowKey = Guid.NewGuid().ToString();

            var result = _repository.Create(model);

            return result;
        }
    }
}
Now before we proceed, lets take a quick look again at our “Create” method in our service class. As you can see, I’m specifically setting the “PartitionKey” and “RowKey” properties on the UserAccount contract, before I submit it to the database layer. This is a fundamental requirement for every row in a Microsoft Windows Azure Table, as the database itself is cloud hosted, and runs on partitions i.e. If you were storing booking data for users, and you wanted to store all the bookings for a particular user named “Charlotte123”, then you could happily assign the PartitionKey for all of Charlotte’s bookings to be “Charlotte123”, and this would in turn mean that all of her data was stored in the same hard drive partition in the database.
…Over time you’ll see the performance gains from this choice - Something to bear in mind when you set out to use this technology. The RowKey itself is just the unique Id for accessing that particular line of data from the table, so feel free to make that something which is truly unique, such as a GUID.
Now lets hook Azure into our Web.config file
Now for the slightly more complex part using Autofac. Head to your main projects “Web.config” file, and we’ll hook into our local Azure Table Storage Explorer. Within the Web.config file, just above the tag, create yourself a fresh tag (assuming you don’t already have any), and add a new item specifically for the Azure development connection string as follows -
<?xml version="1.0" encoding="utf-8"?>
<configuration>
  <connectionStrings>
    <add name="AzureTableStorageDebug" connectionString="UseDevelopmentStorage=true" />
  </connectionStrings>
  <appSettings>
    <add key="webpages:Version" value="3.0.0.0" />
    <add key="webpages:Enabled" value="false" />
    <add key="ClientValidationEnabled" value="true" />
    <add key="UnobtrusiveJavaScriptEnabled" value="true" />
  </appSettings>
Just a few more Nuget packages…
At this point you’ll need to pull in the following packages from Nuget, into your main project -
- Autofac.
- Autofac.Mvc5.
- WindowsAzure.Storage.
- Microsoft.Owin.Security.OAuth.
- Microsoft.Owin.Host.SystemWeb.
Configuring Autofac for Asp.Net MVC
Next, create yourself a new static config class called “AutofacConfig” within the “App_Start” folder, alongside the other config classes. Add in references to all the service and repository class libraries we just created, followed by the references to the additional packages I just mentioned.
using Autofac;
using Autofac.Integration.Mvc;
using SimonGilbert.Blog.Repositories;
using SimonGilbert.Blog.Services;
using Microsoft.WindowsAzure.Storage;
using Microsoft.WindowsAzure.Storage.Table;
using Owin;
using System;
using System.Configuration;
using System.Web.Mvc;

namespace SimonGilbert.Blog
{
    public static class AutofacConfig
    {

    }
}
We will start with configuring the Azure Storage Account to interact with the Autofac container. Create a method that passes in an instance of the Autofac ContainerBuilder class, and registers the connection string which we obtained for Azure, from our Web.config file.
public static class AutofacConfig
{
    private static void ConfigureStorageAccount(ContainerBuilder builder)
    {
        var connection = ConfigurationManager
                            .ConnectionStrings["AzureTableStorageDebug"]
                            .ConnectionString;
        builder.Register(c => CreateStorageAccount(connection));
    }

    private static CloudStorageAccount CreateStorageAccount(string connection)
    {
        if (String.IsNullOrEmpty(connection))
        {
            throw new Exception("AzureTableStorageDebug connection string is null!");
        }
            return CloudStorageAccount.Parse(connection);
    }
}
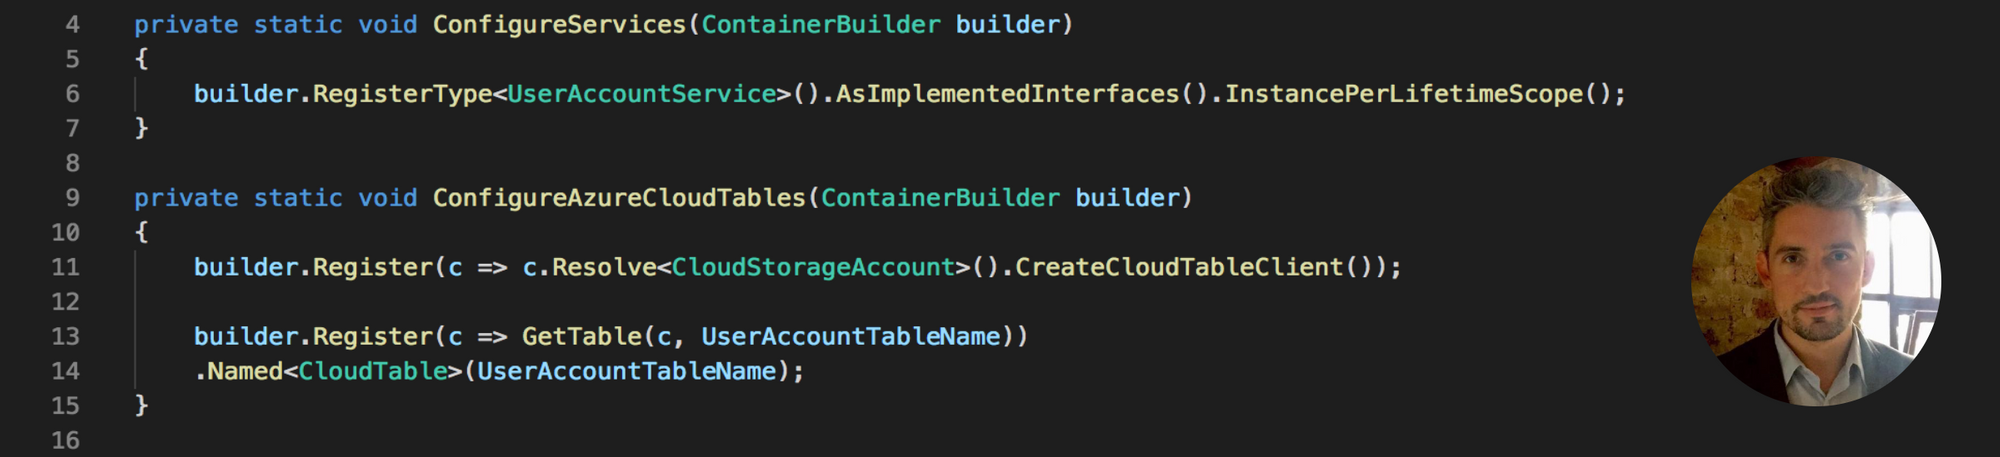
Following this, we register our service class with our Autofac ContainerBuilder, as an InstancePerLifetimeScope.
private static void ConfigureServices(ContainerBuilder builder)
{
    builder.RegisterType<UserAccountService>().AsImplementedInterfaces().InstancePerLifetimeScope();
}
Next is the Azure Cloud Tables registration with our ContainerBuilder. Note the line about “CreateIfNotExists” - This is key to ensure the table is created locally when you first compile and run the project.
private const string UserAccountTableName = "UserAccounts";

private static void ConfigureAzureCloudTables(ContainerBuilder builder)
        {
            builder.Register(c => c.Resolve<CloudStorageAccount>().CreateCloudTableClient());

            builder.Register(c => GetTable(c, UserAccountTableName))
                .Named<CloudTable>(UserAccountTableName);
        }

        private static CloudTable GetTable(IComponentContext context, string tableName)
        {
            var table = context.Resolve<CloudTableClient>().GetTableReference(tableName);
            table.CreateIfNotExists();
            return table;
        }
Now we have the table configured and registered, we can assign this to the database repository using the same table name. You’ll note that I’ve purposely added a const string for the table name, as we re-use this name throughout our AutofacConfig class.
private static void ConfigureRepositories(ContainerBuilder builder)
        {
            builder.RegisterType<UserAccountRepository>()
                   .WithParameter(
                       (pi, c) => pi.ParameterType == (typeof(CloudTable)),
                       (pi, c) => c.ResolveNamed<CloudTable>(UserAccountTableName))
                       .AsImplementedInterfaces();
        }
Before we register the container itself, we need to register the MVC controllers with the ContainerBuilder, and set the AutofacDependencyResolver.
private static void ConfigureMVCControllers(ContainerBuilder builder)
{
    builder.RegisterControllers(typeof(MvcApplication).Assembly);
}

/// <summary>
/// Note that the mechanism for setting the dependency resolver
/// for Web API and MVC is different.
/// Web API uses GlobalConfiguration.Configuration.DependencyResolver,
/// and MVC uses DependencyResolver.SetResolver.
/// </summary>
private static void SetMVCDependencyResolver(IContainer container)
{
    //Set the dependency resolver for MVC.
    var mvcResolver = new AutofacDependencyResolver(container);
    DependencyResolver.SetResolver(mvcResolver);
}
Finally, we can add our Register method into our AutofacConfig class, and call all of the methods we just implemented to piece together our end-to-end flow of the service layer, hooking into the database repository and binding to our Azure Storage table.
public static IContainer Register(IAppBuilder app)
{
    var builder = new ContainerBuilder();

    //Autofac
    ConfigureMVCControllers(builder);
    ConfigureStorageAccount(builder);
    ConfigureServices(builder);
    ConfigureAzureCloudTables(builder);
    ConfigureRepositories(builder);

    var container = builder.Build();
    DependencyResolver.SetResolver(new AutofacDependencyResolver(container));

    SetMVCDependencyResolver(container);

    return container;
}
Registering our AutofacConfig Container at Runtime
Now, you’re probably wondering why we needed those additional Owin packages earlier, and I’ll explain why now. The static config file you have just created isn’t to be called from the Global.asax file, and instead needs to be called from a Startup.cs file which runs as part of Owin, and is only picked up by the compiler if you install the aforementioned packages…
…So let’s create a Startup.cs file in our main project, and call our AutofacConfig.Register method from there!
using Microsoft.Owin;
using Owin;

[assembly: OwinStartup(typeof(SimonGilbert.Blog.Startup))]
namespace SimonGilbert.Blog
{
    public partial class Startup
    {
        public void Configuration(IAppBuilder app)
        {
            AutofacConfig.Register(app);
        }
    }
}
Injecting our Autofac Service into our MVC Controller
All our components are now configured as a module and are ready to be injected into our desired MVC Controller, to be utilised in a “plug and play” fashion as and when necessary.
The final step is simply to inject the top-level service into our controllers constructor, and then setup some action methods to call the various methods on our service interface -
using SimonGilbert.Blog.Contracts;
using SimonGilbert.Blog.Services.Interfaces;
using System.Web.Mvc;

namespace SimonGilbert.Blog.Controllers
{
    public class HomeController : Controller
    {
        private readonly IUserAccountService _userAccountService;

        public HomeController(IUserAccountService userAccountService)
        {
            this._userAccountService = userAccountService;
        }

        [HttpGet]
        public ActionResult Index()
        {
            var userAccounts = _userAccountService.GetAll();

            return View(userAccounts);
        }

        [HttpGet]
        public ActionResult Create()
        {
            return View();
        }

        [HttpPost]
        public ActionResult Create(UserAccount model)
        {
            var result = _userAccountService.Create(model);

            return RedirectToAction("Index", "Home");
        }
    }
}
Voilà!
You’re now injecting your Microsoft Azure Table Storage CRUD layer dependencies into your client as a reusable plug-and-play component!
Enjoy!